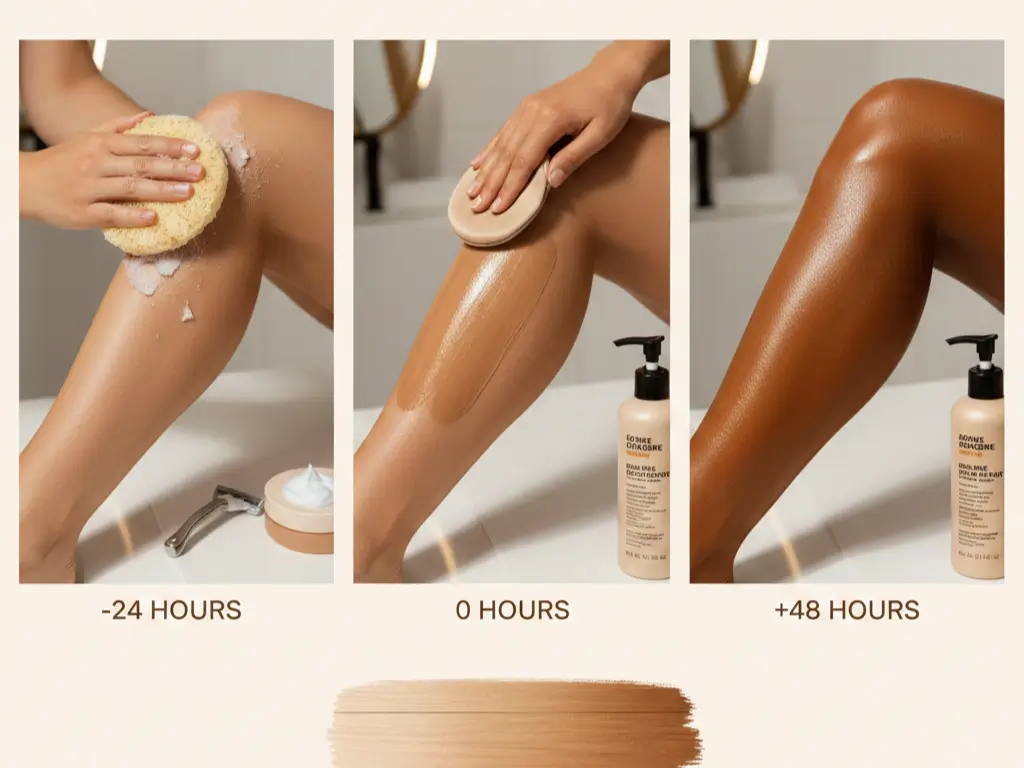
I’m going to tell you something that contradicts almost every self-tanning tutorial out there: your tan isn’t made or broken during those five minutes of application.
It’s decided in the 72 hours surrounding it.
After watching countless people blame their patchy, orange results on “bad products” or “wrong technique,” I’ve noticed the real pattern. The ones who get that natural-looking bronze glow? They’re doing completely different things 24 hours before they open the bottle and 48 hours after they think they’re done.
Self-tanning works like staining wood. The active ingredient (DHA) reacts with dead skin cells on your surface. If that surface is uneven, dry, or has invisible barriers, you’ll get uneven color. Period.
This guide walks you through the actual 72-hour timeline that determines whether you look sun-kissed or streaky. I’ll also explain the chemistry everyone skips (because it matters), the difference between self-tanners and bronzers (they’re not interchangeable), and what to do when things go wrong.
What Actually Happens When You Self-Tan (The Chemistry Nobody Explains)
Self-tanners contain DHA (dihydroxyacetone), a colorless sugar that reacts with amino acids in your dead skin cells. This chemical reaction creates brown compounds called melanoidins, similar to how bread browns when baking. The reaction takes 2-8 hours and darkens over 24-72 hours.
Most people skip understanding this part. That’s a mistake.
When you apply self-tanner, you’re not applying color, you’re triggering a chemical reaction on your skin’s outermost layer. DHA penetrates only the stratum corneum (the dead cell layer), which is why tans fade as you shed skin cells. You’re literally watching your tan exfoliate away over 5-10 days.
Here’s why this matters for application:
Temperature affects development. Warmer skin (like right after a hot shower) speeds up the reaction, which sounds good but often creates darker patches in warm areas like knees and elbows. Room temperature skin gives more even results.
pH balance influences color tone. DHA reacts best at a slightly acidic pH (4.5-5.5). If your skin is too alkaline from harsh soaps or you’ve just used certain treatments, the reaction can shift orange instead of brown. This is why some people always look orange, it’s not the product, it’s their skin chemistry.
Moisture level determines penetration. Bone-dry skin absorbs product unevenly (dark patches). Damp skin dilutes the formula (light patches). You want completely dry skin that’s been properly hydrated before application day. Think of it like priming a wall before painting.
Some formulas now include erythrulose alongside DHA. Erythrulose reacts slower (2-3 days) but produces a more red-brown tone that looks less orange. It’s gentler but requires patience.
For those interested in the science behind beauty ingredients, our guide to specialty natural ingredients dives deeper into how botanical compounds interact with skin chemistry.
The 24 Hours Before: Why Most Self-Tanning Failures Start Here
The day before application, exfoliate thoroughly to remove uneven dead skin buildup, avoid oil-based products that create barriers, shave or wax (not the same day), and moisturize dry areas like knees, elbows, and ankles. Your skin’s surface condition determines 80% of your result.
This is where people mess up, then blame the product.
Your Pre-Tan Checklist (Timing Matters)
24 hours before: If you’re going to shave or wax, do it now. Not the day of. Freshly shaved skin is slightly irritated with open pores, self-tanner will grab onto those areas and create dark spots. Give your skin 24 hours to calm down.
12-24 hours before: Exfoliate everywhere you plan to tan. And I mean actually exfoliate, not a quick body wash with exfoliating beads. You need to remove the uneven buildup of dead cells.
Here’s what works:
- Physical: Exfoliating gloves or mitts with real pressure (check out exfoliating glove options for effective tools)
- Chemical: AHA or BHA body lotions applied the night before
- Traditional: Dry brushing before your shower
Focus extra attention on knees, elbows, ankles, knuckles, and feet. These areas naturally accumulate thicker dead skin.
6-12 hours before: Moisturize your entire body with a lightweight, water-based lotion. This evens out your skin’s absorption rate. Skip this step, and you’ll get leopard print results.
Pay special attention to chronically dry areas. I like to apply a thin layer of barrier cream or petroleum jelly to ankles and knuckles, these areas grab too much color otherwise.
2-4 hours before: Stop all skincare. Your skin needs to be completely product-free and dry when you apply self-tanner. Any residue creates an invisible barrier that blocks even development.
Don’t apply deodorant, perfume, or body oil. These all interfere with DHA absorption.
If you’re working on overall skin barrier health, you’ll notice self-tanner applies more evenly on well-maintained skin. Healthy skin = even surface = better results.
Application Hour: The Techniques That Actually Matter
Apply self-tanner to completely dry skin using a tanning mitt in long, sweeping motions. Work in sections (legs, torso, arms), blend thoroughly at joints, and use leftover product on hands and feet. Wait 10-15 minutes before dressing in loose, dark clothing.
You’ve done the hard work in prep. Don’t blow it now.
The Application Process (Step-by-Step)
Your setup: You need a tanning mitt (absolutely non-negotiable), your self-tanner, and a well-lit room. Bathroom lighting is usually terrible for this, move to a room with better light if possible.
Section approach: Don’t try to do your whole body at once. Work in sections so you can blend thoroughly before the product starts to set.
My order:
- Legs (front and back)
- Torso (stomach, chest, back, yes, you need help with back)
- Arms
- Hands and feet (barely any product)
Application technique: Pump product onto your mitt (not your skin), then apply in long, continuous strokes. Don’t rub in circles, that creates swirl patterns.
For joints (knees, elbows, ankles), blend with almost no product. These areas are naturally darker and drier, so they grab color fast. Some people dilute their tanner with moisturizer for these spots.
Hands and feet: This is where most people create the telltale “I self-tan” look. Use only the leftover product on your mitt, don’t add more. Blend over the tops of hands and feet, avoiding palms and soles. Then immediately wash your palms with soap and water.
For a more detailed approach to body care techniques, our body care and sculpting guide covers additional methods for overall skin preparation.
Face application: Face skin is more sensitive and visible. Many people use a separate face-specific formula or dilute their body tanner 50/50 with face moisturizer. Apply with clean hands or a separate face mitt, avoiding hairline, eyebrows, and beard line (if applicable).
Some people prefer adding self-tanning drops to their regular moisturizer for gradual, controlled face color. This is actually the smarter approach for beginners.
The waiting period: Don’t get dressed immediately. Stand around awkwardly for 10-15 minutes while the initial layer dries. When you do dress, choose loose, dark clothing. Your tan is still developing and can transfer.
For those exploring natural self-tanning alternatives, many of the same application principles apply, though natural formulas may develop more slowly.
The 48 Hours After: How to Make Your Tan Last (or Fix It Fast)
Wait 6-8 hours before showering (longer if possible), use lukewarm water without harsh soaps when you do, moisturize daily with lightweight lotions, and avoid chlorine, exfoliation, and long hot baths. Your tan will darken over 24-48 hours before beginning to fade around day 5-7.
This phase determines whether your tan lasts three days or ten.
The First 8 Hours (Critical Window)
Your tan is still developing. The DHA reaction continues for 6-8 hours, sometimes longer. During this time:
Don’t shower. I know you want to. The guide on the bottle probably says you can rinse after 4 hours. But if you want maximum color development, wait as long as you can stand it. Overnight is ideal.
Avoid sweating. No workouts, no hot yoga, no saunas. Sweat can create drip marks and uneven patches.
Sleep smart. Use dark sheets you don’t care about, or put down a dark towel. Some transfer is normal, despite what products claim.
Days 1-2 (Development Phase)
Your first shower: Use lukewarm water and gentle, sulfate-free cleansers. The sulfate-free shampoo principles apply here too, harsh surfactants strip color faster.
Pat dry, don’t rub aggressively.
Moisturize religiously. Your tan fades as your skin sheds. Well-moisturized skin holds onto cells longer, meaning longer-lasting color. Apply lotion 2-3 times daily. Water-based formulas work better than heavy oils for tan maintenance.
Watch for patchiness. If you notice uneven areas in the first 24 hours, you can carefully exfoliate just those spots to lighten them. Use a damp washcloth with gentle pressure.
For significant fixes, lemon juice on a cotton pad can lighten areas (but test this carefully, it’s acidic). You can also find dedicated tan removers, though honestly, exfoliation and time work fine.
Days 3-7 (Maintenance Phase)
Your tan should be fully developed by day 2-3. Now you’re just maintaining it.
What fades your tan faster:
- Hot showers and baths (stick to lukewarm)
- Chlorine (pool and hot tub)
- Exfoliation (skip your usual body scrubs)
- Harsh soaps and body washes
- Long water exposure (extended swimming)
Some people do light touch-up applications every 3-4 days to maintain color rather than letting it fade completely and starting over. This works if your initial application was even.
If you’re incorporating self-tanning into a broader skincare routine for your body, time your active treatments (like exfoliating acids) for the days between tanning cycles.
Self-Tanner vs. Bronzer: Which One for Your Situation?
Self-tanner creates a lasting tan (5-10 days) through a chemical reaction with skin cells, requires 24-hour development, and needs careful application. Bronzer provides immediate temporary color that washes off with soap and water, requires no prep, but transfers to clothing. Choose self-tanner for multi-day results, bronzer for same-day events.
These aren’t the same thing, and using the wrong one for your situation creates frustration.
The Actual Difference
| Factor | Self-Tanner | Bronzer |
| How It Works | Chemical reaction (DHA + skin cells) | Temporary cosmetic pigment |
| Development Time | 6-24 hours to full color | Immediate |
| Duration | 5-10 days (fades gradually) | Until you wash it off |
| Prep Required | Yes (exfoliation, moisture balance) | No (just apply to skin) |
| Transfer Risk | Minimal after development | High (stains clothes, sheets) |
| Fix Mistakes | Difficult (requires waiting or removal) | Easy (just wash off) |
| Best For | Ongoing tan look, beach/pool events | Special events, testing a look |
When to Choose Self-Tanner
You want a tan that lasts through multiple days without reapplication. You’re willing to plan ahead (the 72-hour timeline). You’re okay with gradual fading and maintenance. You need something that won’t transfer to your wedding dress, workout clothes, or light-colored furniture.
Self-tanner works best for people who want to maintain a consistent bronze look and are willing to establish a routine.
When to Choose Bronzer
You have an event tonight and need color now. You want to test how you look with a tan before committing to the multi-day process. You only need the bronze look occasionally. You’re applying to visible areas only (legs, arms, décolletage) and can avoid transfer situations.
Body bronzers are basically makeup for your body. They wash off with soap and water, which makes them forgiving but also impractical for everyday use.
Some people use both strategically: maintain a base self-tan and add bronzer for extra glow on special occasions.
For those interested in a broader beauty routine, beautyhealingorganic.com offers extensive guides on natural and organic approaches to skin care and beauty that complement any tanning routine.
Product Format Breakdown (Self-Tanners)
Mousse: Fast-drying, visible guide color, easier to see where you’ve applied. Best for beginners. Can be drying on already-dry skin.
Lotion: More hydrating, slower to dry, invisible application (harder to track coverage). Better for dry skin types.
Spray: Quick application for large areas, but messier and harder to control. Not ideal for beginners.
Drops: Add to your regular moisturizer for gradual, customizable color. Most forgiving option for face and for people who want subtle results. Takes longer to build color.
Towelettes: Pre-measured, portable, minimal mess. Good for travel or quick touch-ups, but more expensive per application.
Making Self-Tanning Actually Work for You
Here’s what I want you to take away from this: self-tanning isn’t complicated, but it is specific.
The timeline matters. Surface prep matters. Understanding that you’re creating a chemical reaction (not applying paint) matters.
Most “bad self-tanning experiences” come from skipping the 24 hours before or messing up the 48 hours after. The actual application? That’s the easy part.
If you’ve never self-tanned before, start with gradual tanning drops mixed into lotion. Apply every other day until you reach your desired shade. This builds color slowly and forgives mistakes.
If you’ve tried before and hated the results, the problem was probably prep or product formula. Try a different product type (mousse vs. lotion) and absolutely follow the 72-hour timeline this time.
If you self-tan regularly but struggle with even fading, focus on moisturization between applications and consider doing lighter touch-ups rather than full-body applications each time.
The other thing? Don’t expect self-tanner to look like a real tan. It won’t. But a good self-tan application looks natural and healthy, which is the actual goal.
For those looking to understand more about skin care timing and routines, the chronobiology beauty guide explores how timing affects various skin treatments, including self-tanning development.
Give yourself three attempts to get it right. The first time will be a learning experience. The second will be better. By the third, you’ll know exactly what your skin needs.
And if all else fails? Bronzer for the weekend wedding and try self-tanner again next month.