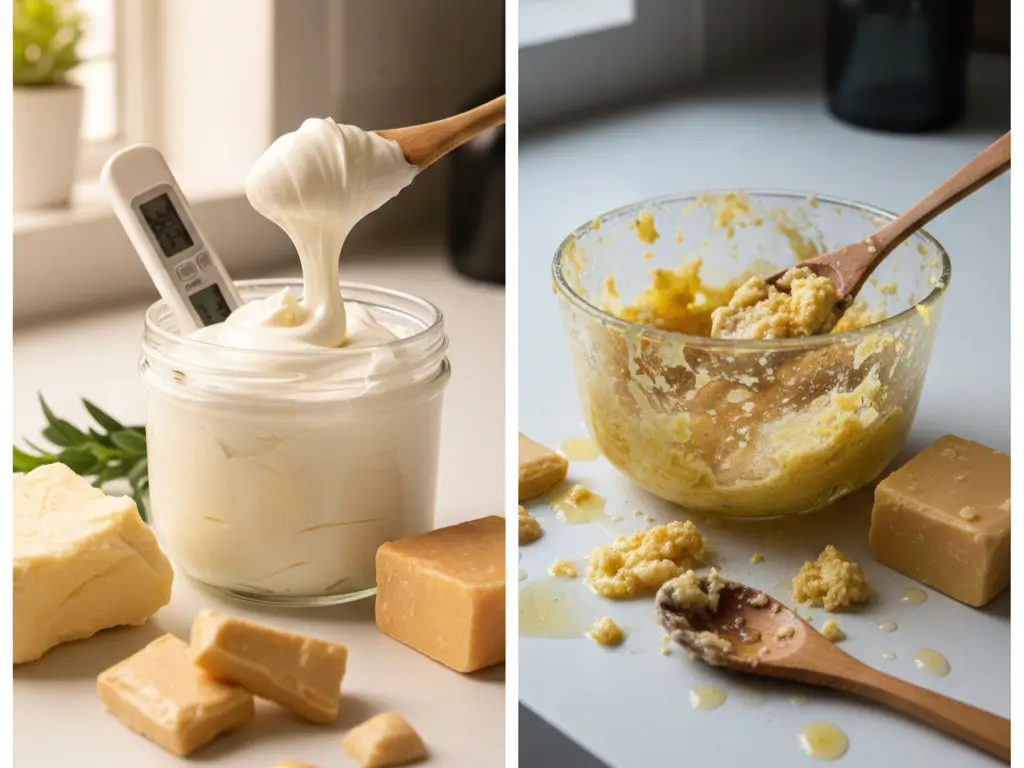
You’ve probably made body butter before. Maybe it turned out perfect and creamy. Or maybe, more likely, you ended up with a grainy, separated mess that felt nothing like the silky texture you were hoping for.
DIY body butter with shea, cocoa, and mango butters is less about following a recipe and more about understanding temperature control. The difference between luxurious whipped cream and grainy disappointment often comes down to just a few degrees.
I’ve made this mistake more times than I’ll admit. I followed recipes exactly, used quality ingredients, and still got that weird sandy texture. What changed everything wasn’t a different recipe, it was learning why butter crystallizes and how to prevent it.
Why Shea, Cocoa, and Mango Butters Work So Well Together
Shea butter provides deep moisture and easy absorption, cocoa butter adds firmness and shelf stability, while mango butter creates silky texture and prevents the mixture from being too hard. Together, they balance texture, moisture, and durability better than any single butter alone.
Each butter brings specific properties that the others lack. This isn’t about throwing in “exotic” ingredients for marketing, it’s practical formulation.
Shea butter (melting point: 89-100°F) absorbs quickly and contains high levels of oleic and stearic acids. It’s your moisture workhorse. But alone, it can feel too soft and greasy, especially in warm climates.
Cocoa butter (melting point: 93-101°F) is the structural backbone. It’s hard at room temperature, which gives your body butter stability and prevents it from melting on your shelf in July. The downside? Too much makes your product stiff and difficult to scoop.
Mango butter (melting point: 86-98°F) is the mediator. It’s softer than cocoa butter but firmer than shea, with a creamy texture that makes the final product feel luxurious rather than waxy. It also contains vitamin A and antioxidants that support skin barrier function.
When you combine them in the right ratios, you get a body butter that’s firm enough to hold shape, soft enough to scoop easily, and smooth enough to melt on contact with skin. Understanding these botanical butters and how they interact is the foundation of good formulation.
Here’s what matters for performance:
| Property | Shea Butter | Cocoa Butter | Mango Butter |
| Hardness | Soft | Very hard | Medium |
| Absorption | Fast | Slow | Medium |
| Slip/Glide | Moderate | Low | High |
| Shelf Life | 12-24 months | 24+ months | 12-18 months |
| Best Climate | Cool to moderate | All climates | Warm to moderate |
Most people pick these butters because they sound nice. But now you know why they actually work together.
The Essential Ingredients and Tools You Actually Need
You need three butters (shea, cocoa, mango), one carrier oil (like coconut or jojoba), optional vitamin E for preservation, essential oils for scent, plus a double boiler, hand mixer, and clean jars. Total cost: roughly $25-35 for 16 oz of finished product.
Let’s be realistic about what you’re spending and what you actually need.
Base Ingredients (for 8 oz finished product):
- 2 oz shea butter ($2-3)
- 2 oz cocoa butter ($2-3)
- 2 oz mango butter ($3-4)
- 2 oz liquid oil, coconut, jojoba, or sweet almond ($1-2)
- ½ tsp vitamin E oil, optional but extends shelf life ($1)
- 10-15 drops essential oils, lavender, vanilla, or unscented ($2-3)
Equipment:
- Double boiler or heat-safe bowl over pot
- Hand mixer or stand mixer
- Digital thermometer (this matters more than you’d think)
- Clean glass jars with lids
- Spatula
What you don’t need: Fancy emulsifiers, preservatives (if you keep water out), or specialty equipment. This is an anhydrous (water-free) formula, which means it won’t grow bacteria if you keep it dry.
The ratio I use: Equal parts of each butter plus equal liquid oil. So 25% shea, 25% cocoa, 25% mango, 25% liquid oil. This creates a balanced texture that works for most climates and skin types.
Some formulations skip the liquid oil entirely. That makes a very firm product that’s harder to spread. The oil loosens the texture and improves absorption. If you want to explore more about different oils and butters and their properties, the combinations are nearly endless.
One more thing: Don’t cheap out on ingredients, but don’t overpay either. Unrefined, organic butters from reputable suppliers work best. You want butters that smell like they’re supposed to, nutty for shea, chocolatey for cocoa, mild for mango. No smell often means over-refined and stripped of beneficial compounds.
Step-by-Step: Making Body Butter That Stays Smooth
Melt butters and oil together at low heat (120-140°F), cool to 70-75°F while stirring occasionally, then whip at high speed for 5-8 minutes until fluffy. The cooling step prevents graininess, most recipes skip this completely.
Here’s where most recipes fail you. They tell you to melt, cool “until solid,” then whip. That vague instruction is why you get grainy results.
Step 1: Melt Your Butters and Oil
Set up your double boiler with about 2 inches of water in the bottom pot. Add all your butters and liquid oil to the top bowl. Heat on medium-low until everything melts completely. Don’t rush this, overheating causes problems later.
Target temperature: 120-140°F. Higher than that and you risk changing the butter structure. Lower and your cocoa butter might not melt completely.
Step 2: Remove from Heat and Add Extras
Once fully melted and combined, remove from heat. Let it cool for 2-3 minutes, then add your vitamin E and essential oils. Stir thoroughly with a spatula.
Step 3: The Critical Cooling Phase
This is what separates smooth body butter from grainy mess. Pour your mixture into a bowl (metal or glass works best, it conducts temperature better). Place it in the refrigerator.
Here’s the specific process: Cool until the mixture starts to solidify around the edges but is still soft in the center, roughly the texture of soft-serve ice cream. This takes 30-60 minutes depending on your refrigerator and batch size.
Temperature matters: You want it around 70-75°F when you start whipping. Too warm and it won’t hold air. Too cold and you get graininess.
Check it every 15 minutes. When you can drag a spoon through it and leave a trail that holds its shape, you’re ready.
Step 4: Whip Until Fluffy
Using a hand mixer on high speed, whip the mixture for 5-8 minutes. You’ll see it transform from soft butter to fluffy, cloud-like cream. The volume should roughly double.
Don’t stop too early. Proper aeration is what gives you that luxurious texture. The mixture should hold stiff peaks like whipped cream.
Step 5: Transfer and Store
Scoop your whipped body butter into clean, dry jars. It’ll firm up slightly over the next 24 hours as it reaches room temperature equilibrium.
Store at room temperature (60-75°F) away from direct sunlight. It should last 6-12 months if you used vitamin E and kept everything water-free.
This process is similar to other DIY clean beauty formulations where temperature control makes or breaks the final product. If you’re interested in understanding the science behind proper formulation techniques, check out resources on advanced DIY formulation.
How to Prevent and Fix Grainy Body Butter
Graininess happens when cocoa or shea butter crystallizes unevenly during cooling. Prevent it by cooling slowly to 70-75°F before whipping. Fix existing graininess by remelting completely, then cooling properly. It’s not a failed batch, just improper crystallization.
Let’s talk about the elephant in the room. That grainy, sandy texture that makes your beautiful body butter feel like you’re rubbing beach sand on your skin.
Shea and cocoa butter contain different types of fatty acids that crystallize at different temperatures. When you cool too quickly or at inconsistent temperatures, these fatty acids form separate, large crystals instead of uniform small ones. That’s your graininess.
Think of it like tempering chocolate. Same principle, you’re trying to create uniform crystal structure.
Prevention strategies:
- Slow, steady cooling (70-75°F is the sweet spot)
- Consistent temperature (don’t move it around during cooling)
- Don’t over-whip (creates heat from friction)
- Use refined cocoa butter if graininess persists (it has more uniform melting point)
Already grainy? Here’s the fix:
Remelt your body butter completely in a double boiler. Heat it to 140°F to reset all crystal structures. Then cool it properly this time, slow and steady to that 70-75°F range before whipping.
I know it’s frustrating to redo work, but this actually works. I’ve salvaged countless batches this way.
Once properly made, keep your body butter away from temperature fluctuations. Don’t store it in the bathroom where steam heat changes the temperature constantly. A bedroom dresser or linen closet works better.
Some people never get graininess. They live in climate-controlled homes with stable temperatures. If you’re not that lucky, understanding how to store organic skincare properly becomes essential. Temperature stability matters more than you think.
For more detailed troubleshooting on common DIY skincare issues, there’s a comprehensive guide on troubleshooting DIY skincare that covers everything from separation to shelf life concerns.
Customizing Your Body Butter for Climate and Skin Type
Hot climates need more cocoa butter (30-40%) and less liquid oil (15-20%). Cold climates can handle more liquid oils (30%) and less cocoa (20%). Dry skin benefits from added jojoba or avocado oil; oily skin works better with lighter oils like grapeseed or fractionated coconut oil.
The recipe I gave you works for most people in moderate climates. But if you live in Phoenix or Minnesota, you’ll need adjustments.
Climate Modifications
| Climate | Cocoa Butter | Shea Butter | Mango Butter | Liquid Oil |
| Hot/Humid | 35% | 25% | 25% | 15% |
| Moderate | 25% | 25% | 25% | 25% |
| Cold/Dry | 20% | 30% | 20% | 30% |
Hot climates need firmer body butter that won’t melt in your bathroom. Cold climates need softer formulas that you can actually scoop without a chisel.
Skin Type Adjustments
For dry skin, replace some coconut oil with:
- Avocado oil (deeply nourishing)
- Jojoba oil (mimics skin sebum)
- Argan oil (vitamin E-rich)
For oily or acne-prone skin:
- Use fractionated coconut oil (stays liquid, lighter feel)
- Add grapeseed oil (non-comedogenic)
- Consider rosehip seed oil (balancing)
For sensitive skin:
- Skip essential oils or use very gentle ones like chamomile
- Consider calendula-infused oil
- Test small batches first
Your skin’s needs change with climate and environment too. What works in January might feel too heavy in July.
Scent customization
- Lavender (10 drops): Calming, classic
- Vanilla (8 drops): Sweet, comforting
- Peppermint (5 drops): Cooling, energizing (use less, it’s potent)
- Citrus blend (12 drops): Uplifting, fresh
- Unscented: Just skip the essential oils
If you’re interested in the therapeutic aspects of scent in skincare, there’s fascinating research on the psychology of scent and essential oils.
One more customization: Add 1-2 tablespoons of arrowroot powder or tapioca starch before your final whip for a drier, more powdery finish that absorbs faster. This works especially well for humid climates or if you find traditional body butter too greasy.
What Your Body Butter Can (and Can’t) Do
This body butter creates an occlusive barrier that locks in moisture. It’s excellent for dry patches, rough elbows and knees, and protecting skin in harsh weather.
What it won’t do: Add water to your skin. Body butters are occlusives, not humectants. For maximum hydration, apply to damp skin right after showering. The butter traps that water against your skin.
If you’re dealing with specific skin concerns, you might want to layer this with targeted treatments. For instance, using natural humectants for dry skin underneath your body butter creates a complete hydration system.
And if you’re building a comprehensive natural body care routine, this body butter pairs beautifully with other DIY body care formulations for a complete system.
Start With Small Batches
Here’s my honest advice: Make 4-6 oz first. Test it for a week. See how it performs in your specific environment with your specific skin.
Maybe you’ll discover you prefer it softer. Or you live somewhere that needs more structure. Or you’re sensitive to coconut oil. Small batches let you experiment without wasting ingredients.
Once you nail your perfect formula, scale up. This recipe doubles and triples easily.
Order your ingredients if you don’t have them. Choose one butter supplier that offers all three so you can trust the quality is consistent. Beauty Healing Organic has extensive guides on sourcing quality ingredients and understanding what makes them work.
Try making your base formula first. Get comfortable with the process. Then experiment with scents and ratios. Keep notes, what worked, what didn’t, what you’d change.
If you find this too fussy or you just don’t have time, there’s no shame in buying quality ready-made products. DIY is about control and customization, not moral superiority.
The best skincare is whatever you’ll actually use consistently. Whether that’s something you whipped up in your kitchen or something you bought doesn’t matter nearly as much as regular application and sun protection.